Welcome to the How to Use section of ERC CDCynergy. If you're a first-time user, this section will give you pointers and tips on how to use this application.
The ERC CDCynergy is a CD-ROM-based tool that addresses a number of topics critical to successful public, partner and stakeholder communication during an emergency situation. Built using the CDC's popular CDCynergy communication process model, ERC CDCynergy presents a practical what-to-do and how-to-do-it guide. The guide is specifically targeted to help federal, state, and local public health communicators prepare for, respond to, and recover from extreme emergencies.
ERC CDCynergy Opening
ERC
CDCynergy begins with an animated introduction. You may skip the introduction
(by clicking any where on the animated photographs) and go straight to
the main menu or click on the ![]() to
begin ERC CDCynergy in the "emergency view."
to
begin ERC CDCynergy in the "emergency view."
(ERC CDCynergy Introduction)
These two ways to enter ERC CDCynergy are explained below.
Two Ways To Enter
Each time you start ERC CDCynergy, you have a choice of two links by which to enter. The emergency view is intended to be used during an actual event or emergency. (Of course, you can, and should, use this view at any time, especially before an emergency to ensure that you are very familiar with its contents.)
The graphic below shows the link from the main menu that takes you to the emergency view.
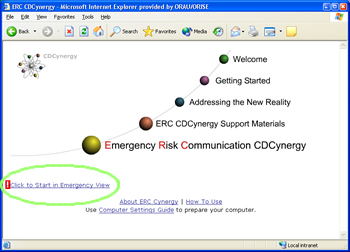
(ERC CDCynergy Main Menu)
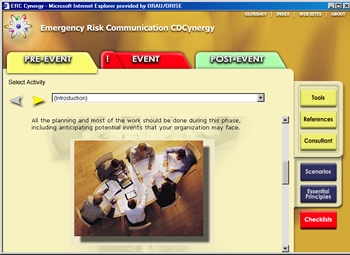
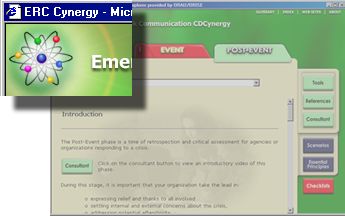
This "emergency" view jumps right to the Event phase and provides quick access to the 6 essential steps all on one screen and the main tools for each of those steps. The graphic below shows the emergency view.
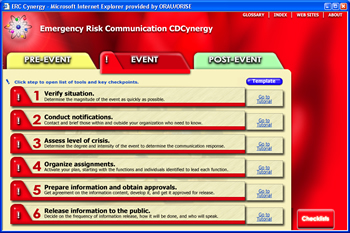
(ERC CDCynergy "emergency" view)
Notice that you can still access the full tutorial (what to do and how to do it) for each of these six steps by clicking on the "Go to Tutorial" for each step.
However, it is most likely that during an actual event you will want to concentrate on the essentials that need to be done for each of these steps and what tools are available to help you do it. You can find this information by clicking on the red ! or step title.
For example, clicking on step 3, would display the tools and key checkpoints for assessing the level of crisis, as shown below:
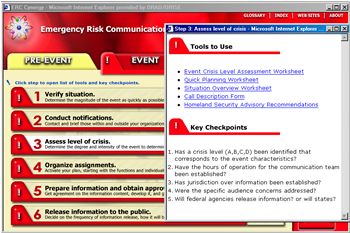
(ERC CDCynergy "emergency" view with tool window open)
A second way to enter ERC CDCynergy is to click on "Emergency Risk Communication CDCynergy" from the main menu.
![]()
When you enter through this link, the ERC CDCynergy tutorial window view is open. The view automatically starts in the Pre-Event phase; however, you can switch to any phase immediately by clicking the top folder tab for that phase.
(ERC CDCynergy tutorial - Pre-Event Phase)
Notice that regardless of which link you use to enter, both views (tutorial and emergency) are always available to you. Spend a few minutes your first time in the program clicking the top tabs and you will see how the main navigation feature works.
Moving your cursor over the titles on the main menu displays information about that item on the left hand side of the screen.
(Main Menu
Options)
- Click on the "Welcome" link to view a video welcome message from the director of the Centers for Disease Control and Prevention.
- Click on the "Getting Started" link to see tips on using ERC CDCynergy for first-time users.
- Click on the "Addressing the New Reality" link to see a video montage that conveys the challenge of health communication in today's world.
- Click on the "ERC CDCynergy Support Materials" for course documents, video clips of classes, templates of tools, and other support materials.
- Click on "Emergency Risk Communication CDCynergy" from the main menu to go to the ERC CDCynergy tutorial.
Step-by-Step Tutorials
ERC CDCynergy is a three-phase tutorial, presented in a folder format, that aligns with the three main phases of communication during an emergency event: Pre-Event, Event, and Post-Event.
(ERC CDCynergy Tutorial)
To go to a different phase, click a tab at the top of the folder. Each phase opens with an Introduction step.
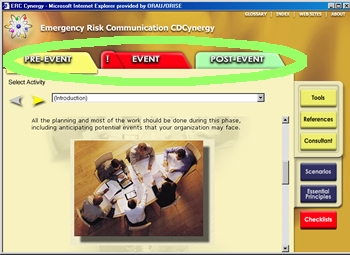
(ERC CDCynergy Phase Tabs)
When you're ready to delve into the details of each phase, click on the right arrow or select the next step from the pull-down menu.
(ERC CDCynergy Navigation Controls)
Each phase has the same layout and navigation controls and, each phase has its own set of steps, as well as its own distinct phase color.
(ERC CDCynergy Phase Colors)
Each of the main steps is explained in terms of "what to do" and "how to do it."
("What To Do" and "How To Do It")
As you move from phase to phase, the information changes under the top three side buttons.
(Tools, References, and Consultant Buttons)
Tools
The first button on the side panel gives you access to the pertinent tools for the current step. A tool is any resource that can be used; for example checklists, forms, templates, etc.
(Tools Button)
Click on the Tools button to see a list of the tools selected for the current phase. You may use some, all or none of these tools. Click on the link beside the tool name to see a printable version of that tool.
(Tool List Window)
All of the tools are generic in nature and can be used as is or adapted for your organization. A file copy of each tool is located in the Sample Documents folder and is in a form that can be edited by your word processor. (See "Tailoring ERC CDCynergy".)
Some tools are designed to be used before (Pre-Event phase) or after (Post-Event phase) an emergency. Others can be used during an actual event. It is wise to look over all of the information and tools for the Event Phase and acquaint yourself with their use thoroughly before an actual event.
A slightly
different tool list is shown when you are in the emergency view (![]() ).
The emergency view takes you directly to the six immediate tasks that
should be conducted in the order shown when an event occurs. This list,
displayed when you click on the red button step, shows only the essential
tools that are likely to be used during the actual event.
).
The emergency view takes you directly to the six immediate tasks that
should be conducted in the order shown when an event occurs. This list,
displayed when you click on the red button step, shows only the essential
tools that are likely to be used during the actual event.
(Tool List From emergency View)
References
The second button on the side panel gives you access to the pertinent references for the current phase. References include policies, articles, documents, Web sites, etc.
(Reference Button)
Most reference items are available by clicking on the link beside the title.
(Reference Window)
Consultant Videos
The third button on the side panel opens a video-based Consultant window.
(Consultant Button)
Each phase begins with an expert giving you the overview and focus of that phase.
(Consultant Window)
Click the Transcript link to view a written script of the consultant's advice.
(Consultant Window with Transcript)
The Consultant
button on the side panel allows you to go directly to the consultant videos
used in each phase. As you move through the tutorial, you will be directed
to each video at the appropriate time in the "what to do" and
"how to do it", so you need not worry about missing any important
consultant information. When you see this icon ![]() 55 in the tutorial text you may click on it to see a related video
segment. If you prefer not to interrupt your reading, all videos used
on a page are listed at the bottom of that page.
55 in the tutorial text you may click on it to see a related video
segment. If you prefer not to interrupt your reading, all videos used
on a page are listed at the bottom of that page.
All videos are uniquely identified with a superscript number above the video icon for reference only; the same video clip may be referenced in more than one tutorial page or essential principle module. The index contains a list of all video segments used in ERC CDCynergy.
Scenarios
The scenarios are fictitious examples of emergency risk communication during an event.
(Scenario Button)
Each scenario is presented along a time line of the six immediate steps of the Event phase. This demonstrates the emergency risk communication picture over that period of time.
(Scenario Window)
There are 4 scenarios in ERC CDCynergy. Each involves a different type of disaster. Click on the scenario title buttons to see each scenario unfold.
At the end of each of the six event steps, you are presented with an "Ask Yourself" button.
Click on this "Ask Yourself" button to display a list of questions that you should reflect on with others in your organization as you view the scenario.
Essential Principles
(Essential
Principles Button)
Information under the Essential Principles button is common to all phases and is easily accessible from each step. Some of the important background information that you'll review in these modules is shown in the graphic below.
(Essential Principle Modules)
A basic understanding of Emergency Risk Communication essential principles is necessary in order to effectively plan a communication response. You will be referred to these modules throughout ERC CDCynergy. You can review any or all of the Essential Principles before beginning the tutorial, or, access them at anytime for a refresher.
Checklists (the "big red button")
One button that is available at all times throughout ERC CDCynergy is the Checklists button, a.k.a. "the big red button."

Under this button are three critical checklists that may become your most frequently visited spot during an event.
- The Event: Immediate Checklist is a checklist of all key checkpoints in all 6 immediate event steps.
- The Team/Function Master Assignment Checklist is a master list of all tasks done by the emergency risk communication team.
- The Phases and Steps of the Emergency Risk Communication Process give you a single-screen view of the entire ERC process, activities, and steps.
Other Links
From any folder view, you can access information common to all phases or not directly related to any phase. This information is available from the menu bar in the upper right corner.
(Other Links)
The "Glossary" gives you an alphabetized listing of common terms used throughout ERC CDCynergy.
(Glossary)
Run the cursor over the "Web Sites" link to reveal a listing of five Web sites related to ERC CDCynergy.
When activated, the "Virtual JIC / Hot Sync" link will take you to a specially prepared Web site for health communicators during a national emergency or event. This site will act as a virtual joint information center for risk communication professionals. This special web site will also allow those with handheld computers to download the latest available contact lists, fact sheets, and other information suitable for portable devices.
Stay tuned to the CDCynergy Home page for the latest developments about this feature.
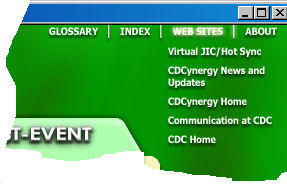
(Web Sites)
The "About" link contains information about the ERC CDCynergy program, release versions, the program purpose and intended audience, etc.
(About)
To return to the main menu choices, click the atom icon in the upper left corner of the tutorial window.
(To Access Main Menu)
The atom icon will return you to the tutorial main menu:
(Main Menu)
Tailoring ERC CDCynergy
ERC CDCynergy contains many checklists, templates, and other documents that you may find useful for creating documents that are specific to your office and organization. You can also have these documents linked inside the ERC CDCynergy program instead of the generic ones that come on the CD.
All documents available on any Tool list are available in MSWord®format and .rtf format. These documents are located in the "Sample Documents" folder on this CD-ROM.
|
Steps For Accessing and Editing A Sample Document |
|
| Step 1: | Copy the contents of the "Sample Documents" folder to a hard drive or network area (any place where you can edit the files). |
| Step 2: |
Find the desired document.
|
| Step 3: |
Open the document in your word processor.
|
| Step 4: |
Make the necessary changes in the tool. Save the file in a location of your choice.
|
| Steps For Making Your Version of the Document Display in ERC CDCynergy | |
| Step 1: | Copy the entire contents of the ERC CDCynergy CD-ROM to a hard drive, network area, or other storage place that has at least 640Mg of free disk space. |
| Step 2: | Follow the steps above to edit a sample document. |
| Step 3: | After saving the document (in Word or other format), create a PDF file of the document, using Adobe Acrobat®. |
| Step 4: |
Place the .pdf document, or a copy of the pdf document, in the following folder of ERC CDCynergy: your drive:\Content\activeinformation\resources |
|
IMPORTANT:You must name the file exactly as it was in the Sample Documents folder and place it in the folder shown above. You will be replacing a .pdf file in that folder (your back up is on the original CD-ROM). By giving the file the same name (e.g., CKBOX_equipment_supplies.pdf) that document will display inside ERC CDCynergy. |
|
FAQs About CDCynergy
1. Which Browser can I use with CDCynergy?
2. What are the preferred browser settings for CDCynergy?
6. What are the minimum system specifications for CDCynergy?
8. Resource documents are not opening when I click on the links. Why?
1. Which Browser can I use with CDCynergy?
<return to FAQ list>Answer: CDCynergy was developed to be used with the following browsers:
- Netscape Navigator version 4 and above
- Internet Explorer 5 and above (preferred)
2. What are the preferred browser settings for CDCynergy?
Answer: Because most of the CDCynergy content is run entirely through browser windows (Netscape or Internet Explorer) and contains multimedia, there are certain browser preference settings that should be selected in order that you may view all materials.<return to FAQ list>Netscape:
Select Edit, Preferences, from the menu bar.
Click the "Advanced" link in the left menu. The following items in the Advanced window should be checked: ·Internet Explorer:
- "Automatically load images"
- "Enable JavaScript"
Select View, Internet Options from the menu bar.
Click the "Advanced" tab in the upper right hand side of the screen. The following items in the scrolling list should have a check or a dot beside of them: ·
- "Java JT compiler enabled"
- "Play videos"
- "Play sounds"
- "Play animations"
Click the "Security" tab at the top of the screen. Click on the small dot beside "Custom," then click the button labeled "Settings " The following items in the scrolling list should have a check or a dot beside them:
- "Active Scripting" should have "Enable"
3. When I have the tutorial window displayed, how do I get back to the main menu options --the ones that were available after the animated opening played
Answer: You can return to the main menu options at anytime by clicking on the atom graphic located in the top left corner.
(To Access Main Menu)
4. Whenever I play a media piece my screen is full of commercials and is very distracting. How can I get rid of all the extra stuff in the Real Media window?
Answer: The Real Player screen that you see is controlled by settings on your machine, not CDCynergy. The view you see from your Real Player plug-in can be changed. You have the option of selecting which screen components to display by using the View menu options. You can also press CTRL-M to immediately switch to the compact view. The Real Player compact view looks like this:

5. How do I print out a step's tutorial or any of the screens that do not have the browser toolbar displayed?
Answer: You can print from your browser, even when the print button (in the toolbar) is turned off. To do this first click in the area you want to print. (The CDCynergy program is built in frames, so you must click first to identify the frame.) Then press CTRL-P. (This method works for both Netscape and I.E.)
6. What are the minimum system specifications for CDCynergy?
Answer: The minimum system specifications for CDCynergy are:
- Pentium Series 266MHz
- CD drive (24x recommended)
- 32 Mb RAM (64 Mb recommended)
- Windows ®95/98, NT.4.0, or 2000
- Adobe® Acrobat® Reader(available from the Computer Settings Guide)
- Shockwave® player (available from the Computer Settings Guide)
- RealPlayer® (available from the Computer Settings Guide)
- Web Browser (I.E. 5.0 or Netscape 4.0 available from the Computer Settings Guide)
- Screen Display: 800x600, in thousands of colors
7. After I open several pdf files (Adobe) they stop opening; my screen status displays "done" but there is no document showing in the browser window. Why?
Answer: Older versions of the Adobe Reader do not always clear out of the browser's memory after you close them. This causes the Reader plug in to act as though you have too many pdf windows open. You can fix this problem by either:
1. Closing CDCynergy and all browser windows, then restarting CDCynergy.
2. Close your browser windows; install the latest version of Adobe® Acrobat® Reader from the web site: http://www.adobe.com.
8. Resource documents are not opening when I click on the links. Why?
Answer: There could be several reasons why this is happening. Check the following list and take action accordingly.
Too many PDF documents already open. Close unneeded PDF resources. If none are open, see suggestion for question 7 above. PDF resource is opening, but it is not coming to the front of the screen (just looks like the resource is not opening). To determine if this is what is happening, look at your task bar and click to the resource title. Upgrade to the latest version of Adobe Reader. You can do this from from http://www.adobe.com Link is pointing to an incorrect or out of date resource. Notify the CDCynergy manager at http://www.cdc.gov/cdcynergy